

Front-end and back-end integration is the step where a good-looking page finally becomes a working application. You can design the most beautiful form in the world, but until it can send data to a server and show a real answer, it is only a picture. Integration is the bridge that makes the two sides talk to each other.
In this guide, you will learn what front-end and back-end integration means, which building blocks make it work, how to connect both sides in seven easy steps and how to fix the problems beginners meet most often. Simple examples are used throughout, so you can follow along even if you are new to development.
If you are still learning the basics, start with How Does a Website Work? and our Introduction to Full-Stack Development, then come back here.
Table of Contents
What Is Front-End and Back-End Integration?
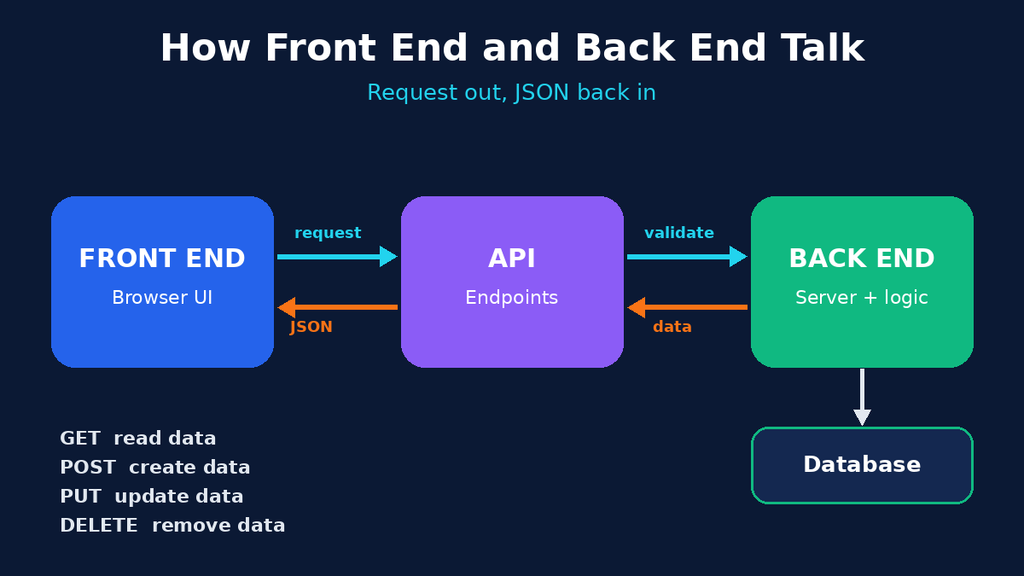
Front-end and back-end integration is the process of connecting the part of an application that users see (the front end) with the part that runs on the server (the back end) so that they can exchange data. The front end collects actions such as clicks and form entries. The back end applies rules, talks to the database and sends a result back.
A theatre is a good comparison. The audience sees the stage, which is the front end. Behind the curtain, a crew moves props, controls lights and follows a script, which is the back end. The stage manager’s radio, which carries messages between the stage and the crew, is the API. Without that radio, nothing would happen at the right time.
In technical terms, the front end sends a request over HTTP, the back end processes it and the response usually comes back as JSON. That simple loop is the core of every integration you will ever build.
(Yahan Image 3 lagao: front-end-and-back-end-integration-flow.png)
Why Front-End and Back-End Integration Matters
Good front-end and back-end integration is what makes an app feel alive. Here is why it matters:
- Real data: pages show live information such as products, messages and orders instead of fixed text.
- User accounts: logins, profiles and saved settings all depend on both sides working together.
- Security: sensitive checks, such as passwords and payments, must happen on the server and not in the browser.
- Better user experience: fast, clear responses and helpful error messages keep visitors happy.
- Easier teamwork: when the connection is planned well, front-end and back-end developers can work at the same time without blocking each other.
The Building Blocks of Integration
Before you connect anything, you need to know the tools both sides use to communicate.
APIs and Endpoints
An API is a set of rules for how two programs talk. Each address you can send a request to is called an endpoint. For example, /api/tasks might return a list of tasks, and /api/login might check a user’s password.
HTTP Methods
The method tells the server what you want to do:
| Method | Purpose | Example |
|---|---|---|
| GET | Read data | Load all tasks |
| POST | Create new data | Add a new task |
| PUT / PATCH | Update existing data | Mark a task as done |
| DELETE | Remove data | Delete a task |
JSON
JSON is the simple text format most applications use to send data. It looks like this: {"title": "Learn APIs", "done": false}. Both JavaScript and almost every back-end language can read and write it easily.
Status Codes
The server answers with a number that explains what happened. A code of 200 means success, 201 means something was created, 400 means the request was wrong, 401 means the user must log in and 500 means the server had a problem.
How Front-End and Back-End Integration Works: A Simple Example
Let us follow a basic to-do app. A user types a task and clicks “Add”.
- The front end reads the text from the input box.
- It sends a POST request to
/api/taskswith the task as JSON. - The back end checks that the text is not empty.
- It saves the task in the database.
- It sends back the saved task with a 201 status.
- The front end adds the new task to the list on the screen.
Here is the front-end side, written with the browser’s built-in fetch function:
javascript
const res = await fetch("/api/tasks", {
  method: "POST",
  headers: { "Content-Type": "application/json" },
  body: JSON.stringify({ title: "Learn APIs" })
});
const task = await res.json();
And here is the matching back-end route using Node.js and Express:
javascript
app.post("/api/tasks", async (req, res) => {
  if (!req.body.title) return res.status(400).json({ error: "Title required" });
  const task = await Task.create({ title: req.body.title });
  res.status(201).json(task);
});
These two small pieces of code are a complete example of front-end and back-end integration. The front end asks, the back end validates and saves, and the answer returns as JSON.
Front-End and Back-End Integration in 7 Easy Steps
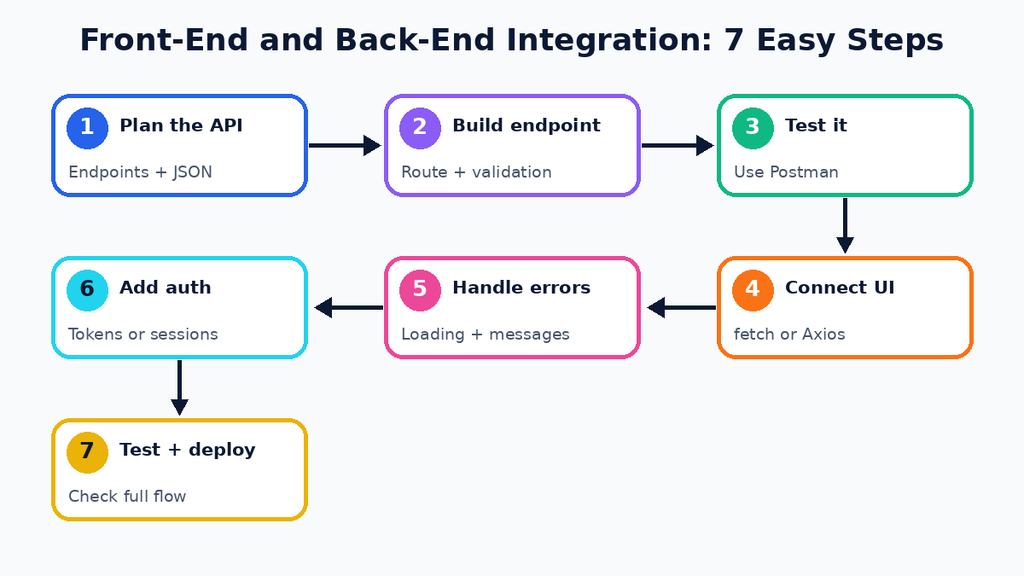
Follow this order whenever you connect a new feature.
(Yahan Image 2 lagao: front-end-and-back-end-integration-steps.png)
- Plan the API contract. Decide the endpoints, the methods and the shape of the JSON before writing code. A short written list prevents confusion later.
- Build the back-end endpoint. Create the route, add validation and connect it to the database.
- Test it without the front end. Use a tool like Postman to send requests and check the responses.
- Connect the front end. Call the endpoint with
fetchor Axios and place the returned data on the page. The MDN Fetch API guide explains it clearly. - Handle loading and errors. Show a loading message while waiting and a friendly error if something fails.
- Add authentication. Protect private endpoints with tokens or sessions so only logged-in users can use them.
- Test together and deploy. Check the full flow in the browser, fix mismatches and publish both sides.
For a deeper look at the API side, read our post on Working with APIs in Full-Stack Applications.
REST vs GraphQL: Two Ways to Connect
Most beginners start with REST for front-end and back-end integration, but you will hear about GraphQL too.
| Feature | REST | GraphQL |
|---|---|---|
| Structure | Many endpoints, one per resource | One endpoint, flexible queries |
| Data returned | Fixed by the server | Chosen by the front end |
| Learning curve | Easy | Medium |
| Best for | Most beginner and standard projects | Complex apps with many data needs |
For your first projects, REST is the best choice. You can explore GraphQL later.
Authentication: How Login Works Across Both Sides
Login is the best example of front-end and back-end integration, because both sides must cooperate closely. The process works like this:
- The user types an email and password into the login form.
- The front end sends them to the back end over HTTPS.
- The back end checks them against the database. Passwords should be stored as hashes, never as plain text.
- If they match, the back end creates a token and sends it back.
- The front end stores the token and attaches it to every later request.
- The back end checks the token before it returns any private data.
This pattern protects private pages and keeps one user’s data away from another user.
A Real-World Example: Online Store Checkout
Think about the checkout page of an online shop. The front end shows your cart, the delivery form and the pay button. When you press the button, the front end sends the order to the back end. The back end checks the prices again, confirms the stock, talks to the payment service and saves the order. Then it replies with a success message and an order number, and the front end shows a thank-you page. Every step of this flow is front-end and back-end integration at work, and a small mistake at any point could cost real money.
Who Handles Integration in a Team?
In a large company, front-end and back-end developers agree on the API together and then work in parallel. In a small team or a freelance project, one full-stack developer does both. That is why integration is one of the most valuable skills you can learn, as our guide to the Role of a Full-Stack Developer explains.
Tools That Make Integration Easier
A few free tools will save you hours when you practise front-end and back-end integration:
- Postman: test endpoints before the front end exists.
- Axios or fetch: send requests from the browser.
- Browser DevTools: open the Network tab to see every request and response.
- Swagger or OpenAPI: write and share your API documentation.
- Git and GitHub: keep front-end and back-end code organised and safe.
Common Problems in Front-End and Back-End Integration
Almost every beginner meets these errors during front-end and back-end integration. Knowing the cause makes them easy to fix.
- CORS error: the browser blocks a request from one address to another. Fix it by allowing your front-end address in the back-end CORS settings.
- 404 Not Found: the endpoint address in the front end does not match the back-end route. Check spelling and slashes.
- 500 Server Error: the back-end code crashed. Read the server logs to find the exact line.
- Wrong data format: the front end sends one shape and the back end expects another. Compare both against your API contract.
- Missing token: a protected route returns 401 because the login token was not sent in the request header.
Best Practices for Smooth Integration
These habits keep front-end and back-end integration clean as your project grows:
- Agree on the API contract first and keep it updated.
- Validate data on both sides, but never trust the front end alone.
- Use clear, consistent names for endpoints, such as
/api/tasksand/api/users. - Return helpful error messages and correct status codes.
- Keep secret keys and passwords in environment variables, never in front-end code.
- Test every new endpoint before connecting it to the interface.
Integration in Popular Stacks
The idea stays the same in every stack, only the tools change. In the MERN stack, React talks to an Express and Node.js server that reads from MongoDB. In a Django and React setup, Django exposes API endpoints and React displays the data. In a LAMP site, PHP often builds the HTML directly on the server, so the two sides are more tightly joined. Whatever stack you choose, front-end and back-end integration follows the same request and response pattern.
Frequently Asked Questions
What is front-end and back-end integration in simple words?
It is the connection that lets the part of a website users see send and receive data from the server. APIs and JSON are the usual tools for it.
Which language is best for front-end and back-end integration?
JavaScript is the easiest choice because you can use it on both sides. Python, Java and PHP also work well on the back end.
What is an API in integration?
An API is a set of endpoints that the front end can call to read, create, update or delete data on the server.
Why do I get a CORS error?
Browsers block requests between different addresses by default. You must allow your front-end address in the back-end settings.
How do I test front-end and back-end integration?
Test the endpoint alone with Postman first. Then open your app, perform the action and watch the Network tab in your browser to confirm that the request and response look correct.
How long does it take to learn integration?
If you already know basic JavaScript and one back-end language, you can build your first connected app in two to three weeks of regular practice.
Conclusion
Front-end and back-end integration turns separate pieces into a real application. Plan your API, build and test the endpoint, connect the interface, handle errors and secure private routes. Start with a small project like a to-do app, practise the seven steps and you will soon connect any feature with confidence. Keep practising front-end and back-end integration on every project, and it will soon feel natural.